Safety pros have thousands of tools available at their disposal to standardize practices, deliver insightful results, and protect workers, especially in a profession as dangerous and complex as construction or manufacturing.
Root cause analysis is one of the best tools available to you because it doesn’t treat symptoms or provide quick, temporary fixes. Instead, root cause analysis allows you to deliver improvements to systems to help you identify and correct potential hazards in the future.
Identifying the root cause of an incident, whether it results in a nonconformance, an injury, or a near miss, is the goal of any investigation, but how do you get there?
Use Safesite’s guide to get acquainted with root cause analysis steps, tools, and tips for success.
What is a Root Cause?
A root cause is a defining factor or highest-level cause behind a nonconformance. It’s something tangible that you can eliminate through process improvement.
Root cause analysis isn’t just a smart idea. Both OSHA and the EPA mandate the process as part of a compliant safety program.
If you see something unsafe in a process, your job isn’t just to raise and resolve the hazard and move along. You need to get to the root cause so that it doesn’t occur again.
Why Do You Need to Know the Root Cause of a Slip and Fall?
Let’s say an employee slips and falls in the hallway. The way they landed aggravated an old hip injury. They went to the doctor to get checked out and then took five days off to let the inflammation and pain die down.
You might think, “Hey, they slipped and fell. It happened, and now it’s in the past.” Gravity exists, and falls happen. There’s no need to add an extra 20 minutes of paperwork to explain a slip and fall.
At the same time, you don’t know why they fell — or if anyone else has fallen in that area, which means you don’t know the root cause of the fall.
If you don’t know the root cause, you don’t know if anyone will fall again. And that’s not good.
Let’s return to our example worker with the healed hip injury. As it turns out, they fell because the floor was slippery. And the floor wasn’t just wet, it gets slippery in that area regularly because the floor cleaner used leaves a film on the floor. You ask around, and it turns out people skid or slip there pretty regularly. There are more near-misses and incidents waiting to happen, and you can prevent them by choosing an anti-slip floor cleaner.
By diving deeper into the slip and fall case above, you might find that several people slipped in the same place in the past, but they either caught themselves or didn’t need medical attention or time away from work. As it turns out, that one slip and fall is a symptom of a bigger problem, and you need a solution. That’s where your root cause analysis comes in.
What’s the End Goal of a Root Cause Analysis?
A root cause analysis’s end goal is to pull out actions or processes that lay the foundation for incidents and near-misses. Unfortunately (or fortunately), a root cause is usually an inadequacy in the safety system that allows for influencing factors to contribute to incidents.
You will often find that fixing the symptom rather than the root cause is what takes the most time, energy, and resources.
By reaching a root cause and correcting it, you will accomplish goals like:
- Stronger safety program
- Improved process liability
- Lowered insurance premiums
- Increased efficiency across the board
- Prevention of incident or near-miss recurrence
- Avoidance of other problems and incidents caused by the root cause
- Conservation time and energy by eliminating avoidable hazards
- Saved money on regulatory fines and litigation costs
7 Root Cause Analysis Steps
Now that you understand the value of a root cause analysis, let’s talk about the root cause analysis progression and where it falls within the investigation.
While you don’t start the process right away, you should have it in mind from the beginning so that you can collect the right evidence and create an environment that’s amenable to the root cause analysis techniques we’ll address below.
1. Plan Investigation
With any immediate action needed complete, it’s time to start planning your investigation. The phase involves:
- Defining the scope of the investigation (problem definition and statement)
- Nominating an investigation team
- Identifying data collection methods
- Identify the technique you will use from the list below
- Brainstorming/Five Whys
- Barrier Analysis/ Target-Hazard-Barrier Analysis
- Checklist Techniques
- Sequence Diagrams
- Timelines, Causal Factor Determination, and Charting
- Tree Techniques
These steps are important because they create a structure for your investigation, which is critical for the success of every root cause analysis technique.
For example, if you don’t carefully define your problem and create a problem statement, you could cast your net too wide, collect too much data, and find yourself unable to parse a root cause.
2. Take Immediate Corrective Action
Whether it’s a near-miss or an accident, your first step should always be to take immediate corrective action to prevent further damage.
If it’s an incident, that means seeking medical attention for the work involved, turning off machines, and implementing any protocols associated with the incident type from your safety plan.
3. Record the Hazard
With your plan in place and any further immediate danger eliminated or mitigated, you are prepared to record the hazard. While you need to think about the root cause from the start, the first phase of the incident response may not fully reflect the incident.
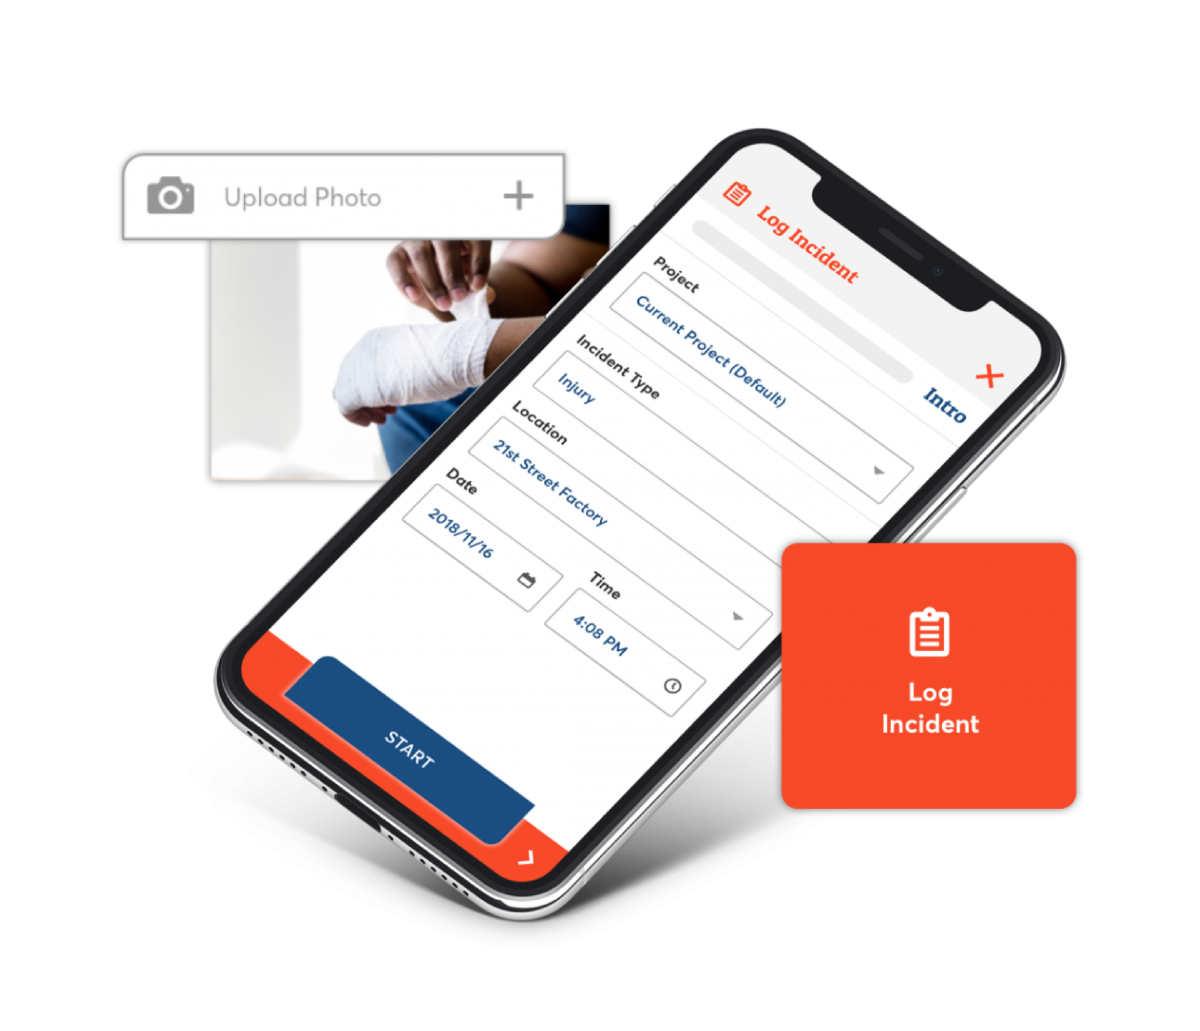
If you’re a Safesite user, all you need to do is tap Add Hazard in the field app, add a description, and upload any photos available. You can also do a simple root cause analysis and add it to the hazard. Just select the activity performed at the time the hazard appeared and then choose the root cause from the dropdown list.

You can also use the app to assign the hazard to the responsible team for further management and resolution. Safesite gives a risk level and sets a deadline for resolving the hazard, so you can easily see what’s still outstanding.
If you become aware of the hazard as the result of an incident or near miss, then you’ll also use the Incident Report feature to capture the scene. You can log the incident, add images from the scene, and import witness statements within one page. Adding data from the location allows you to record the event with greater accuracy and a more in-depth level of detail.
4. Collect Data (Factors) for Extended Root Cause Analysis (if Applicable)
In some cases, you can run a quick root cause analysis and resolve the hazard then and there. Complex or organizational problems may need an extended root cause analysis.
With your team and problem statement in place and the initial details of the hazard logged, it’s time to get out into the field and collect data. In the case of a root cause analysis, data focuses on contributing, classifying, and sorting factors. These may be internal and external and may be data related to:
- Machines
- Methods
- Materials
- Maintenance
- Management
- Mission
- People
- Performance
- Suppliers
- Surroundings
- Skills
Keep in mind that you need a fear-free environment to collect the best data. Data collection should focus on the facts as they stand and always avoid assigning blame. After all, you are not yet at a point where you know what the root cause is. Failing to collect all the relevant information can stop you from reaching it.
5. Find Root Cause
With your data analyzed, you should see a root cause start to appear. Remember: there is often more than one root cause. You don’t need to pick one.
However, if no apparent root cause(s) appear, then it’s time to go back to the drawing table. You may need to reassess your problem, team, data collection technique, or all of the above.
You’ll complete this step using one of the techniques discussed below.
Once you have your root cause, go back to the hazard within the Safesite app, select edit, and choose the Activity Performed and the root cause determined.
Keep in mind: there is often more than one root cause. An incident (or near-miss) and its immediate cause are usually a symptom of more fundamental problems.
6. Corrective and Preventive Actions (CAPA) Report
The Corrective Action and Preventive Action (CAPA) report documents the process so far and proposes remedies for the root cause.
For reference, corrective action is the elimination of the root cause of the hazard or nonconformity. Preventive action ID’s and eliminates the causes of potential nonconformity.
These are two distinct actions because correcting is a reactive measure and preventive is a proactive measure. Usually, you want to focus on the preventive action with the aim of hopefully no longer needing the corrective action. You may need one of these or both, depending on the circumstances.
A CAPA report is required for manufacturers who must comply with FDA 21 CFR 820, but anyone can and should use these reporting styles to capture and prevent nonconformances in their organization.
You can get started with all the data within Safesite. Hit the export button to send the Hazard report to the appropriate teams and start writing your CAPA report.
7. Evaluate Success
With a CAPA report in hand, it’s time to evaluate the success of the process.
Safety pros often define the success of root cause analysis on the ability to eliminate the problem forever. However, you need to make sure that you aren’t doing that at any cost and that you’re working within an acceptable time frame.
Some of the root cause analysis KPIs include:
- Net return on investment of the safety program and root cause analysis program through a reduction in
- incident frequency
- severity of incidents
- insurance premiums
- Success rate for each root cause analysis
- Completion of events and root cause analysis within the budgeted time frame
- Completion of corrective actions within the correct time frame
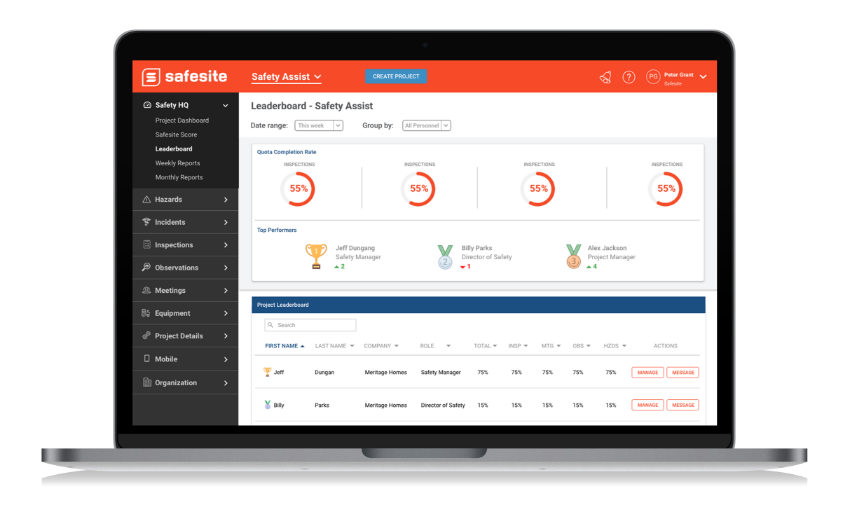
You can use the Safesite Data Analytics feature to track your progress over time. The dashboard provides a look at the big picture as well as in-depth insights into specific events. Safesite generates charts for you to read, download, and share with the tap of a button. The predictive engine also breaks down opportunities for increased safety.
Root Cause Analysis Techniques to Try
While root cause analysis can be as simple as sitting down and having a discussion, it’s crucial to have a strategy in mind before getting started. You can choose from over 100 documented root cause analysis tools and techniques available that help structure your thinking and better work through increasingly complex hazards or incidents.
Brainstorming and Five Whys
The fastest and simplest form of root cause analysis is a good, old fashioned brainstorm. In safety, you hear this technique referred to as the “five whys.”
A brainstorming session involves defining the problem and then asking “why.” Once you have an answer, you ask “why” four more times. Working this way helps you pull out the root cause or causes, but it does require you to know when to stop.
While you can brainstorm in any setting, there are diagrams available to help you standardize the process and expand your thinking. The Fishbone/Ishikawa/Cause-and-Effect diagrams are the most commonly cited example of brainstorming diagrams used in safety and quality control.
You can also use:
- Brainwriting
- Is-is not matrix
- Paired comparisons
- Nominal group technique
Barrier Analysis/ Target-Hazard-Barrier Analysis
Barrier analysis is a methodology that relies on three core elements: the target, the barrier, and the hazard — or the person, the control, and the threat. Using barrier analysis allows you to identify the pathway by which the hazard can impact the actor and how you can maintain safety.
One of the benefits of barrier analysis is that it isn’t deeply complex, and it can help you analyze problems and risks without picking up Maslow’s hammer. However, it can be subjective and thus should be used with other root cause techniques.
Checklists Techniques
Checklist techniques are all different, and not all are ideal for root cause analysis because they tend to use language and actions that attempt to assign blame for an incident. However, checklists are very user-friendly and they’re one of the few techniques available to solo safety pros or in cases when you can’t work with a team.
Some examples include:
- Human Performance Evaluation System (HPEs)
- Systematic Cause Analysis Technique (SCAT)
- Technic of Operations Review (TOR)
- Systematic Accident Cause Analysis (SACA)
Sequence Diagrams
Sequence diagrams and charts are analytical tools that take on many forms and are used to investigate incidents and identify the root cause.
Using these diagrams helps organize information, so nothing gets forgotten or lost.
Keep in mind that these forms can be frustrating to use: they require regular updates because conditions rarely appear in the sequence that they occurred when the incident. You will have gaps, and your focus should remain on filling these gaps.
Timelines, Causal Factor Determination, and Charting
Causal factor determination and charting include diagrams that outline the primary and secondary sequence of events. The chart’s goal is to find yourself with a clear understanding of the complete series of events and the conditions that contributed to each.
Complicated, major incidents lead to very complex charts. However, they provide a useful structure.
Tree Techniques
Tree techniques give you a chance to systematically look at all the potential root causes and consider them as required. It encourages the team to think about a broad range of causal factors rather than focusing on the most obvious culprits. However, some techniques are better geared for solution implementation rather than strict root cause analysis.
- Management Oversight and Risk Tree (MORT)
- Savannah River Plan (SRP) Root Causes
- TAPROOT
- Causal Tree Method (CTM)
- Reason Root Cause Analysis
- Force-field analysis
Why Does Root Cause Analysis Sometimes Fail?
A root cause analysis isn’t a single technique. Instead, it is the umbrella containing a range of approaches. You choose the approach required based on your context.
While using the correct technique improves your chances for success, these investigations fail all the time.
Some of the most common reasons for failed root cause analysis include:
- Wrong problem (problem statement stopped short or bypassed important causal factors)
- Limited perspective or lack of key participants
- Choosing the wrong approach for the context
- Focusing on solutions
- Selecting poor solutions
- Unrelated changes made
Keep in mind that you should be thinking of root cause analysis in your initial response — when you respond to an incident, you want to minimize injury and protect evidence. You want to preserve the scene, if possible, and ensure everyone is willing to participate in the next investigation phase.
A strong safety culture will help you better identify the root causes. If you’re unable to find your way deeper than the immediate cause or you find any of your questions go unanswered, it may be an issue with your safety management program.
See into the Future with Root Cause Analysis Systems
Root cause analsyis is a valuable tool because it allows you to see past the current incident and prevent future injuries. By using root cause analyis tools and tehcniques, like the 5 Whys or Fishboen, you can ID the highest level factor behind a nonconformance.
Remember that no tool is perfect. In addition to using a root cause analysis template, you also need to be sure you’re including the right people, focus on the correct problem, and ultimately choose a solution that caters to the data at hand.
Do you run a root cause analysis after every recordable incident? Simplify the process and track your safety program progress with Safesite. Set up your free account and start using it in the field in only eight minutes.